Inspiring Stories of Makers Building Autonomous Robots

DARPA grand challenge

As my kids get older, I have enjoyed finding ways that we can learn together, get inspired, and be entertained as a family.   To my surprise my little boys have really enjoyed Nova documentaries.   As a “big kid,”  I find these stories very motivating and insightful.   I wanted to share two of our favorite Nova programs.  You might find them useful for your family or class room.

It’s still amazing to me that we have robots on Mars helping us understand that nature of this planet and it’s history.   The Mars Curiosity Nova program really captures the creativity, passion, energy, and dedication of the leaders of the Mars curiosity program.   I think we can be very proud of our teams at NASA JPL.  They are amazing makers!

Similarly, the Nova program on the DARPA grand challenge tells the stories of various teams who attempted to create autonomous cars that can drive across a desert course.   My kids really enjoy this program.  I think the writers do a good job talking about the role of machine learning and computer vision in creating an autonomous car.   At the same time, the program captures the emotions, leadership styles and team dynamics of the various players in the contest.   Both programs are great case studies in creative teams, computer science, and autonomous technology.   Makers of all ages will find these stories inspiring.

Hope you enjoy it!

NOVA | Ultimate Mars Challenge

Abstract: Why go back to Mars? Far from dead, Mars holds untold potential. Nearly half a century of Mars exploration has yielded tantalizing clues that Mars may once have harbored life—and may harbor it still. The extraordinary landing of a revolutionary rover named Curiosity—which successfully touched down inside the Gale Crater—means we have wheels down on the planet once again, in the form of the most sophisticated robot ever to rove the Mars surface. Will NASA’s bold mission and this marvel of technology answer some of our biggest questions and usher in a new golden age of exploration? NOVA goes behind the scenes on NASA’s quest to solve the riddles of the red planet.


Great Robot Race

Abstract: Twenty-three bizarre looking vehicles line up at the gate of the DARPA Grand Challenge with one thing in common: thereÕs nobody behind the wheel.


Top Stories on InspiredToEducate.NET

Learning To Code

Science Education


Join the Spark Macon Maker Space Community on Facebook


How to use Blockly in Your App [Video]

Are you looking for a way to introduce young makers to computer programming?  Programming by puzzle piece has become very popular user interface to help empower novice users to code.   You can find this programming interface in products like Scratch, MIT app inventor, LearnToMod, and tools at Code.org .   Blockly is the JavaScript library created by Google enabling developers to include “programming by puzzle” interfaces in their web applications.   See our previous post on this JavaScript library.

In the next few weeks, I will be teaching a coding class for middle school students.   While I will be using resources from Code.org for this experience, I wanted to create some special tools to engage these students using metaphors from 3D model building.   This work was inspired by seeing LearnToMod or similar tools.   In my work, I connected Blockly to OpenJSCad to enable kids to build 3D models using code.   Using the strengths of OpenJSCad, makers can 3D print their models using STL format.     You can learn more about OpenJSCAD on this post.

Block Builder

Check out my demo code here: http://inspiredtoeducate.net/blockly/demos/blockbuilder/


I found the following YouTube video and links helpful in constructing my tools.  If you’re going to include a puzzle programming interface in your web application, you have to enable the puzzle programming component to call JavaScript functions in your API.    The following video discusses how to create custom puzzle blocks and link those blocks to your API.

Make sure to check out https://developers.google.com/blockly/ to learn more about this awesome JavaScript library.

It would be fun to see someone connect blockly to robot control systems, voxel.js,  business work flows, or applications empowering young makers.   Let us know if you build anything cool with Blockly!


Top Stories on InspiredToEducate.NET

Learning To Code

Science Education


Join the Spark Macon Maker Space Community on Facebook


5 DIY Projects Involving Lego, Arduino, and Motors

Some things just belong together like peanut butter and jelly.   As I have been building Lego toys with my kids, I started to wonder if you could connect Arduino stuff to Lego stuff. While  my kids really enjoy the Lego Wedo and Lego Mindstorm, those kits can be rather costly.   I started searching for DIY ideas for driving down the cost of tinkering with Lego and Arduino.   I hope that you find these ideas can help inspire your projects and young makers to explore the world of physical computing and robotics.


Arduino Lego Case

Lego Arduino Case: On Instructables, Mr_Oliveira created instructions for building a simple case for your Arduino.  The case can help you interface the Arduino in your next Lego/Arduino project.  Check out the article here.


DIY Lego Motors: Official lego motors and kits can be expensive.   In this video by Jaime Mantzel, learn how to steal motors from old electronics and toys and use them in your lego projects.   His procedure uses some filing, gluing, common lego’s, and rubber bands.


Connecting Servo’s to Lego:  From your local radio shack, you can obtain an inexpensive standard servo for  $12.00 .   A servo contains a motor that can be precisely positioned using an angle signal.   Using cleverly positioned rubber bands, you can interface servo’s Lego bricks and gears.   In the video above, the maker interfaces their Arduino to the servo to control a small Lego structure.

To learn more about programming servo’s using the Arduino platform, check out the following example: http://arduino.cc/en/Tutorial/sweep  .  You will find the sweep example under the “File > Examples” menu in the standard Arduino programming environment.


Lego Arduino bot platform

Lego/Arduino Robot platform: Searching around Thingiverse, I found an notable robot platform enabling you to combine Arduino and Lego together.   I have not personally tested this platform, but I thought the idea of 3D printing your own Lego pieces really fun.  Download and tinker with the files here: http://www.thingiverse.com/thing:311813

If you need to include additional servo’s in your lego build, you might consider 3D printing the following component: http://www.thingiverse.com/thing:7535


Lego RC Car

Lego/Arduino/XBee Remote controlled car:  I am amazed at the creativity that people have with combining Lego and Arduino.   NFrith provides an overview of his experience of building a remote controlled Lego car with his son at the following Instructables.      post: http://www.instructables.com/id/Lego-Technic-Car-with-Arduino-XBee-Wireless-Contro/?ALLSTEPS   It’s a pretty cool build.


Top Stories on InspiredToEducate.NET

Learning To Code

Science Education


Join the Spark Macon Maker Space Community on Facebook


Loading a 3D Model using Three.js

three js

If you’re looking for a way to program 3D experiences for Google Chrome and other modern web browsers, make sure to check out three.js .    For many professional programmers, JavaScript has become an essential language to making web applications.   It still amazes me that we can use JavaScript to create 3D experiences, games, or visualizations.   If you’re interested in learning JavaScript, check out CodeAcademy.com .

My wife, biology professor, asked me if there would be an easy way to share 3D models of cell structures for her classes.   We want to explore 3D printed objects too.  I, however, started to wonder if we could share the 3D model using a custom web page.  While glancing through the three.js examples, I noticed that the library includes an STL model loader and  an example for first person exploration.  An STL file is a standard file format for saving 3D structure.   You can create STL files using software like TinkerCAD.com , openjscad,  or 123D design.   You can also find STL content at thingiverse.com .

You can inspect these examples here:

http://threejs.org/examples/#misc_controls_pointerlock

http://threejs.org/examples/#webgl_loader_stl

In a few hours, I was able to combine the “pointer lock” control and the STL loader program into a single experience.   In this experience, I loaded the “Winter fall” castle.   This model can be found at http://www.thingiverse.com/thing:84866 .

http://inspiredtoeducate.net/blogPostDemos/threejsdemo1.html

Here’s the code for loading a binary STL.


var material = new THREE.MeshPhongMaterial( { color: 0x00AAFF, shininess: 30, specular: 0x111111 } );

var loader = new THREE.STLLoader();
loader.addEventListener( 'load', function ( event ) {

var geometry = event.content;
geometry.computeTangents();
var mesh = new THREE.Mesh( geometry, material );

mesh.position.set( 0, -10, 0 );
mesh.rotation.set( - Math.PI / 2, 0, 0 );
mesh.scale.set( 15, 15, 15 );

mesh.castShadow = true;
mesh.receiveShadow = true;

objects.push(mesh);
scene.add( mesh );

} );

loader.load( './models/winterfell.stl' );

The following line describes the material properties of the STL and color.

var material = new THREE.MeshPhongMaterial( { color: 0x00AAFF, shininess: 30, specular: 0x111111  } );

In the next few lines, we define an event handler to load the STL content into memory.   The geometry data of the STL is combined with the material to create a mesh object.    You can set the position of the mesh, rotation, and scale factors.   In the final two statements, the mesh is added to an “objects” collection and the scene.   By adding the mesh to the “objects” collection, the player will be able to stand on objects defined in your STL file.  If there’s a chair defined in your scene, the player will be able to stand on top of that chair.

The following line executes the loader for the STL you specified.

loader.load( ‘./models/winterfell.stl’ );

If the STL has too much complexity, the STL loader seems to break down.  I would encourage you to tinker with it to see if it works for you.   I was impressed with the number of STL files I was able to load.

Make sure to check out the other great examples on the three.js website.

Here’s a few links to help you get started with three.js .


Top Stories on InspiredToEducate.NET

Learning To Code

Science Education


Join the Spark Macon Maker Space Community on Facebook

Lessons Learned from Blogging in 2014

Sunrise

Good morning!  I hope that you and your family had a Merry Christmas!  I hope you have a happy new year!  To our regular readers, I want to thank you for being a part of our community.  In 2014, many of you actively contributed to building SparkMacon MakerSpace.    Our community is very thankful.   I’m thankful to my friends and mentors who have guided me on my journey.   In the relationships and friendships I’ve made in 2014, I feel very blessed.

Like many, the eve of the New Year has put me in a reflective mood.  I wanted to share my personal retrospective from blogging in 2014.   What did I learn from blogging in 2014?

Focus has been powerful:  Over the two years that I have been blogging, I have challenged myself to focus on a smaller set of ideas.   Since I’m a dad with young children and I’m married to a college professor, I still feel a desire to serve community members who love teaching and learning.  (both formal and grassroots experiences)   I, however, acknowledged that my best contributions and posts relate to helping people gain confidence in code.   From reviewing our analytics data, our readers really enjoy JavaScript programming.   It has been fun covering stories related to trends in “maker education.”    I appreciate the coaching I’ve received on focusing on my strengths.

Love serving  local communities:  Since I started the blog, I’ve wanted to take ideas from the blog and put them into action.   A recurring theme from our posts involves learning by doing and learning by building.   I have really enjoyed serving my local Google Developer Group and helping our local makerspace design learning experiences for our makers.   In 2014, InspiredToEducate.NET left the world of theory and ideation and entered the world of execution.   It has been fun to see ideas from this blog applied to learning experiences in our makerspace, my workplace, and my family.

Seeing the Makers movement go viral:   At SparkMacon, our community opened Middle Georgia’s first makerspace.   Through discussions with the community, it has been fun to see the makers movement influencing a larger scope of learning experiences.   One of my friends who does home schooling has had lots of fun using “invent to learn” strategies with his kids.   Some of our local science museums have started looking into implementing makerspace experiences.   During a Knight Foundation news challenge, there was a healthy discussion on ways local libraries can become makerspaces.    In 2015, it will be fun to see the impact of Maker education in our communities.  We are looking forward to a mini maker faire that will be held in Macon Georgia.

Amazed by young people: It’s fun hearing stories of high school students teaching maker education classes. (see MakerKids.ca)  Meeting young boys and girls who look forward to learning about electronics.  I didn’t learn stuff about electrical system until college.   I’m meeting middle school kids who want to go beyond the basics of Arduino and bread boards.  Our friends at ClubHou.se Augusta have a student who built his own 3D printer!  The potential of children is amazing to me.

Seymor Papert:  On a personal level, I think doing the post on Seymor Papert was important for me.   I’m a computer scientist who loves machine learning.   I’ve been asking myself “why do I like writing a blog on education so much?  Education is not your field!!”   Firstly, I’ve recently discovered that many of the great thinkers in computer science had a heart for using the computer as a means of growing the creative capacity and learning potential of children.  It was cool to find out that this traditional existed.  I don’t feel so weird now.     Secondly, I have started to realize that my richest life experiences come when I learn about learning.   This will be a point of focus for me.

We enjoy hearing from our readers.  What are some of your celebrations from 2014? What was the most powerful idea or lesson you learned this year?

Thanks again for being a part of our community at InspiredToEducate.NET .


Top Blog Posts in 2014


Celebrating Community Learning at SparkMacon MakerSpace

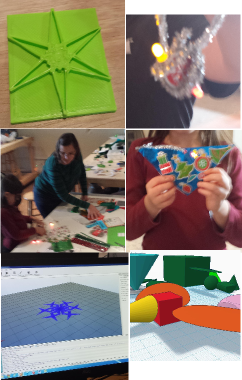
Christmas Ornament Making

On our blog InspiredToEducate.NET, we have reflected on the benefits of learning by making.   It has been fun putting project based learning ideas into action at our new makerspace.   Our team has been given the opportunity to implement project based learning experiences in community meetups.   Our team has completed some informal reflection upon community events so far with the hopes of improving our guest experience.  I wanted to share a few celebrations and ideas we’re considering to make things better.

What’s going well?

  • We are very excited that we’re attracting a variety of makers.    For background, our “open make” night is scheduled the first friday of every month and open to the public.   This event gives our makerspace the opportunity to serve the public at large.  During our first events, our makers have included arduino builders, coders, boot painters, cosplay crafters, artists, lego fans, musicians, and wood workers.   It was neat to see young makers working right beside the adults.

  • One of our key dreams for SparkMacon is that we inspire the next generation of engineers, scientists and artists.  It has been cool to see families bring their kids to the events.   Inspired by the Maker Kids Makerspace and ClubHouse Augusta, our team has been working to make sure young makers feel at home.   The kids seem to enjoy the 3D modeling activities with TinkerCAD and building stuff with Lego Wedo.   During our last open make night, we experimented with building Minecraft worlds using TinkerCAD and MCEdit.
  • I’m really pleased that my wife enjoyed getting to meet other maker families in Macon.   I know that I appreciate getting to make new friends too.  It does give me a feeling of satisfaction knowing that we’re helping to grow positive relationships through these events.   Who knows what the impact of these relationships will be five years from now?
  • It has been cool to see students teaching students.   One of the older kids that attended the open make nights has been showing the younger students how he accomplished certain things in TinkerCAD.   I also caught him showing off his “hour of code” games to his young friends.   I hope we can grow this trend in our young makers programs.  I’m looking forward to seeing our students helping other students to learn and grow.
  • The people who have tried the “hour of code” materials from code.org have really enjoyed themselves.   I got to see one of our young makers enjoying the process of building flappy birds.   Since our first open make night, I have been told that this young man has been asking more questions about learning to code.   (Way cool!!)   We’ve had a few adults show interest in the material too.  I’m looking forward to seeing us do more “learn to code” events in January.
  • Our leadership team at SparkMacon could not pull off these events alone.   It takes a lot of effort to properly market, organize, plan execute, setup and teardown events.  In our early stages, I’m thankful for our SparkMacon members who have volunteered their precious time and effort to make the space functional and welcoming to our community.

In a future blog post, I will try to reflect upon how we plan to improve our community events.


Top Stories on InspiredToEducate.NET

Learning To Code

Science Education


Join the Spark Macon Maker Space Community on Facebook


Logo Programming Goes 3D

OpenJSCAD

As a kid, one of my first programming languages was the Logo.  It’s a really simple language that ran on Apple IIe’s that enables you to draw with code. Logo uses the metaphor of a turtle. The kid programmer can instruct the turtle to drop paint behind it, turn by an angle, and move forward. This simple programming environment was invented by Seymour Papert, a pioneer in helping kids to love math by learning programming.  Check out our blog post on Seymour Papert here.

To help celebrate the “Hour of Code” movement this week, I wanted to share a simple program that implements the Logo turtle metaphor in OpenJSCAD.   OpenJSCad is an open source tool enabling JavaScript programmers to create 3D models using JavaScript.   To learn more about this tool, check out our blog post here.   I hope this program can be used to engage young programmers in middle school and makers.  I think it’s also useful for artists and people who like to tinker. Since OpenJSCad can produce STL files, young programmers and makers can 3D print their creations or use the model files for Minecraft building.

The turtle class encapsulates the idea of the Logo turtle. The turtle exists in 3D space with an X,Y,Z coordinate. The turtle faces in a direction specified in degrees. When you call the “draw” method and provide a distance factor, the turtle moves forward dropping a line behind it. The “move” method shifts the turtle forward by a distance factor. Using the “turn” method, the programmer can change the direction of movement by an angle.  The programmer can set the Z-axis of the turtle.  This enables the turtle to produce 3D objects.

The main turtle class is shown below.   It should be included at the top of all OpenJSCAD code samples in this blog post.

var STARTX = 0;
var STARTY = 0;
var WIDTH = 600;
var HEIGHT = 600;

var Turtle = function()
{
this.X = STARTX;
this.Y = STARTY;
this.Z = 0;
this.Direction = 0;
this.list = [];

//==============================

this.DrawLine = function(x1,y1,x2,y2)
{
var obj = cylinder({start: [x1,y1,this.Z], end: [x2,y2,this.Z], r1: 1, r2: 1, fn: 4});
this.list.push(obj);
}

//==============================


this.Clear = function()
{
this.list = [];
}

//==============================

this.Draw = function(fltDistance)
{
// store current location
var currentX = this.X;
var currentY = this.Y;

// calculate new location
var deltaX = fltDistance * Math.cos(this.Direction);
var deltaY = fltDistance * Math.sin(this.Direction);
var newX = currentX + deltaX;
var newY = currentY + deltaY;

// draw line between the two
this.DrawLine(currentX,currentY,newX,newY);

this.X = newX;
this.Y = newY;
}

//==============================

this.Move = function(fltDistance)
{
// store current location
var currentX = this.X;
var currentY = this.Y;

// calculate new location
var deltaX = fltDistance * Math.cos(this.Direction);
var deltaY = fltDistance * Math.sin(this.Direction);
var newX = currentX + deltaX;
var newY = currentY + deltaY;

this.X = newX;
this.Y = newY;
}

//==============================

this.Turn = function(angle)
{
var delta = (Math.PI * 2.0 * angle) / 360.0;
this.Direction += delta;
}

//==============================

this.GetObjects = function()
{
return this.list;
}

}

So.. Let’s take you through some sample programs that you can write:

Hello Square!

For all code samples to follow, copy the “turtle” class shown previously into the OpenJSCad editor.
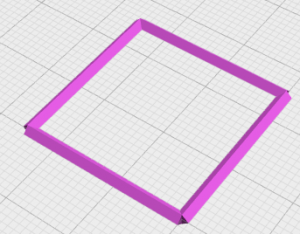
In the following code, we create a turtle instance. By calling “t.Draw(25)”, the turtle draws a line for 25 units. In the next line, we turn the turtle 90 degrees. We repeat the drawing and turning 3 more times to complete the drawing of a square. The turtle object stores all the drawing objects in a list. These drawing commands need to be returned at the end of the “main” function so that OpenJSCAD can process them.  That’s it!

Logo art 0

// Turtle class should be pasted below this line…..

//Sample 1 starts here….

function main()

{

var t = new Turtle();

t.Draw(25);
t.Turn(90);
t.Draw(25);
t.Turn(90);
t.Draw(25);
t.Turn(90);
t.Draw(25);
t.Turn(90);

return t.GetObjects();

}

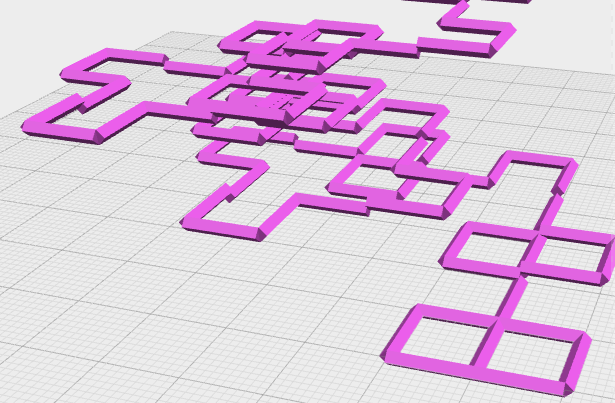
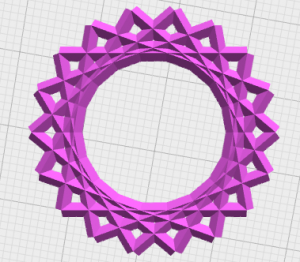
In the following code, we adjust our program to include a loop. Logo systems make really interesting patterns when you don’t turn by 90 degrees and you do lots of looping. As you can see, the result is kind of artful.  You can probably print this and put it on your Christmas tree! 🙂

Logo art 1

// Turtle class should be pasted below this line…..

//Sample 2 starts here….

function main()

{
var t = new Turtle();

for(i=0; i<50; i++){
t.Draw(25);
t.Turn(100);
}

return t.GetObjects();
}

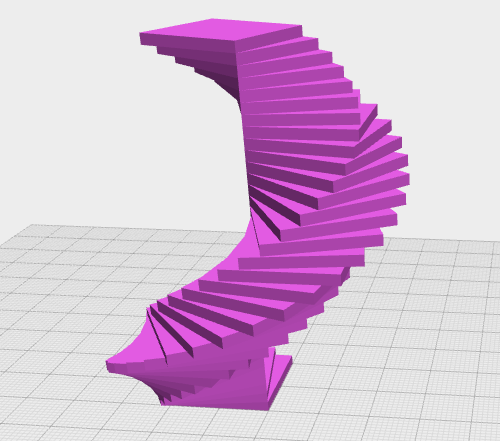
In our final sample, we set the Z factor of the turtle. The Z factor enables the turtle to move up and down in 3D space. Here’s the result.

Logo art 2

// Turtle class should be pasted below this line…..


//Sample 3 starts here….

function main() {

var t = new Turtle();

var k =30;
var z;

for(z=0; z<20; z++)
{
for(j=0; j<30; j++)
{
t.Draw(k);
t.Turn(131);
t.Z = z*2;
}
}

return t.GetObjects();
}

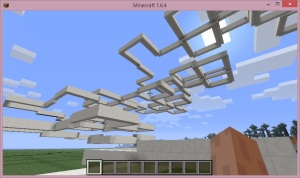
As I was writing this blog post, one of my kids asked me to move one of my Logo sculptures into Minecraft. Using TinkerCAD and MCEdit, we downloaded the model from OpenJSCAD and imported it into Minecraft.  In this Logo program, I enabled the turtle to randomly move around at right angles while moving upward.

Minecraft Logo piece


OpenJSCAD turns JavaScript programming into a way of making cool 3D art.


Top Stories on InspiredToEducate.NET

Learning To Code

Science Education


Join the Spark Macon Maker Space Community on Facebook


Top 10 Posts on Maker Education


Peter and his car

Books

Makerspace Playbook – Maker Education Initiative [free ebook]

Invent To Learn: Making and Tinkering and Engineering in the Classroom by Sylvia Libow Martinez and Dr. Gary Stager


12 Top Posts on InspiredToEducate.NET


loop / rotate / translate

Programming

Science Education


Help us sustain SparkMacon: Our MakerSpace for Macon, GA by supporting our IndieGogo funding campaign.   http://igg.me/at/sparkmacon.

Even small contributions are helpful.   We’re very thankful for the generosity of our readers.

Related Stories on InspiredToEducate.NET:

Stories From MakerFaire NYC 2014